ApkTool项目解析resources.arsc详解
前言 上回说道ApkTool项目的概览,关于ApkTool如何编译,如何运行,还有各个参数的介绍。
总体流程 我们首先执行命令apktool d xxx.apk,然后看输出如下
1
2
3
4
5
6
7
8
9
10
11
12
13
I: Using Apktool 2.3.1 on douyin.apk I: Loading resource table... I: Decoding AndroidManifest.xml with resources... I: Loading resource table from file: C:\Users\hch\AppData\Local\apktool\framework\1.apk I: Regular manifest package... I: Decoding file-resources... I: Decoding values */* XMLs... I: Baksmaling classes.dex... I: Baksmaling classes2.dex... I: Baksmaling classes3.dex... I: Copying assets and libs... I: Copying unknown files... I: Copying original files...
其实这个时候apktool总体做了如下几个步骤
加载resource table
解码AndroidManifest.xml
解码一些资源文件
解码dex文件
copy剩余文件
今天想和大家讨论的只有第一步,关于ApkTool是如何解析resources.arsc的。
如何初始ApkDecoder的成员变量mResTable的,剩下的我们会下次继续探讨。
ps:想看大概结果的,直接跳到最后看图。
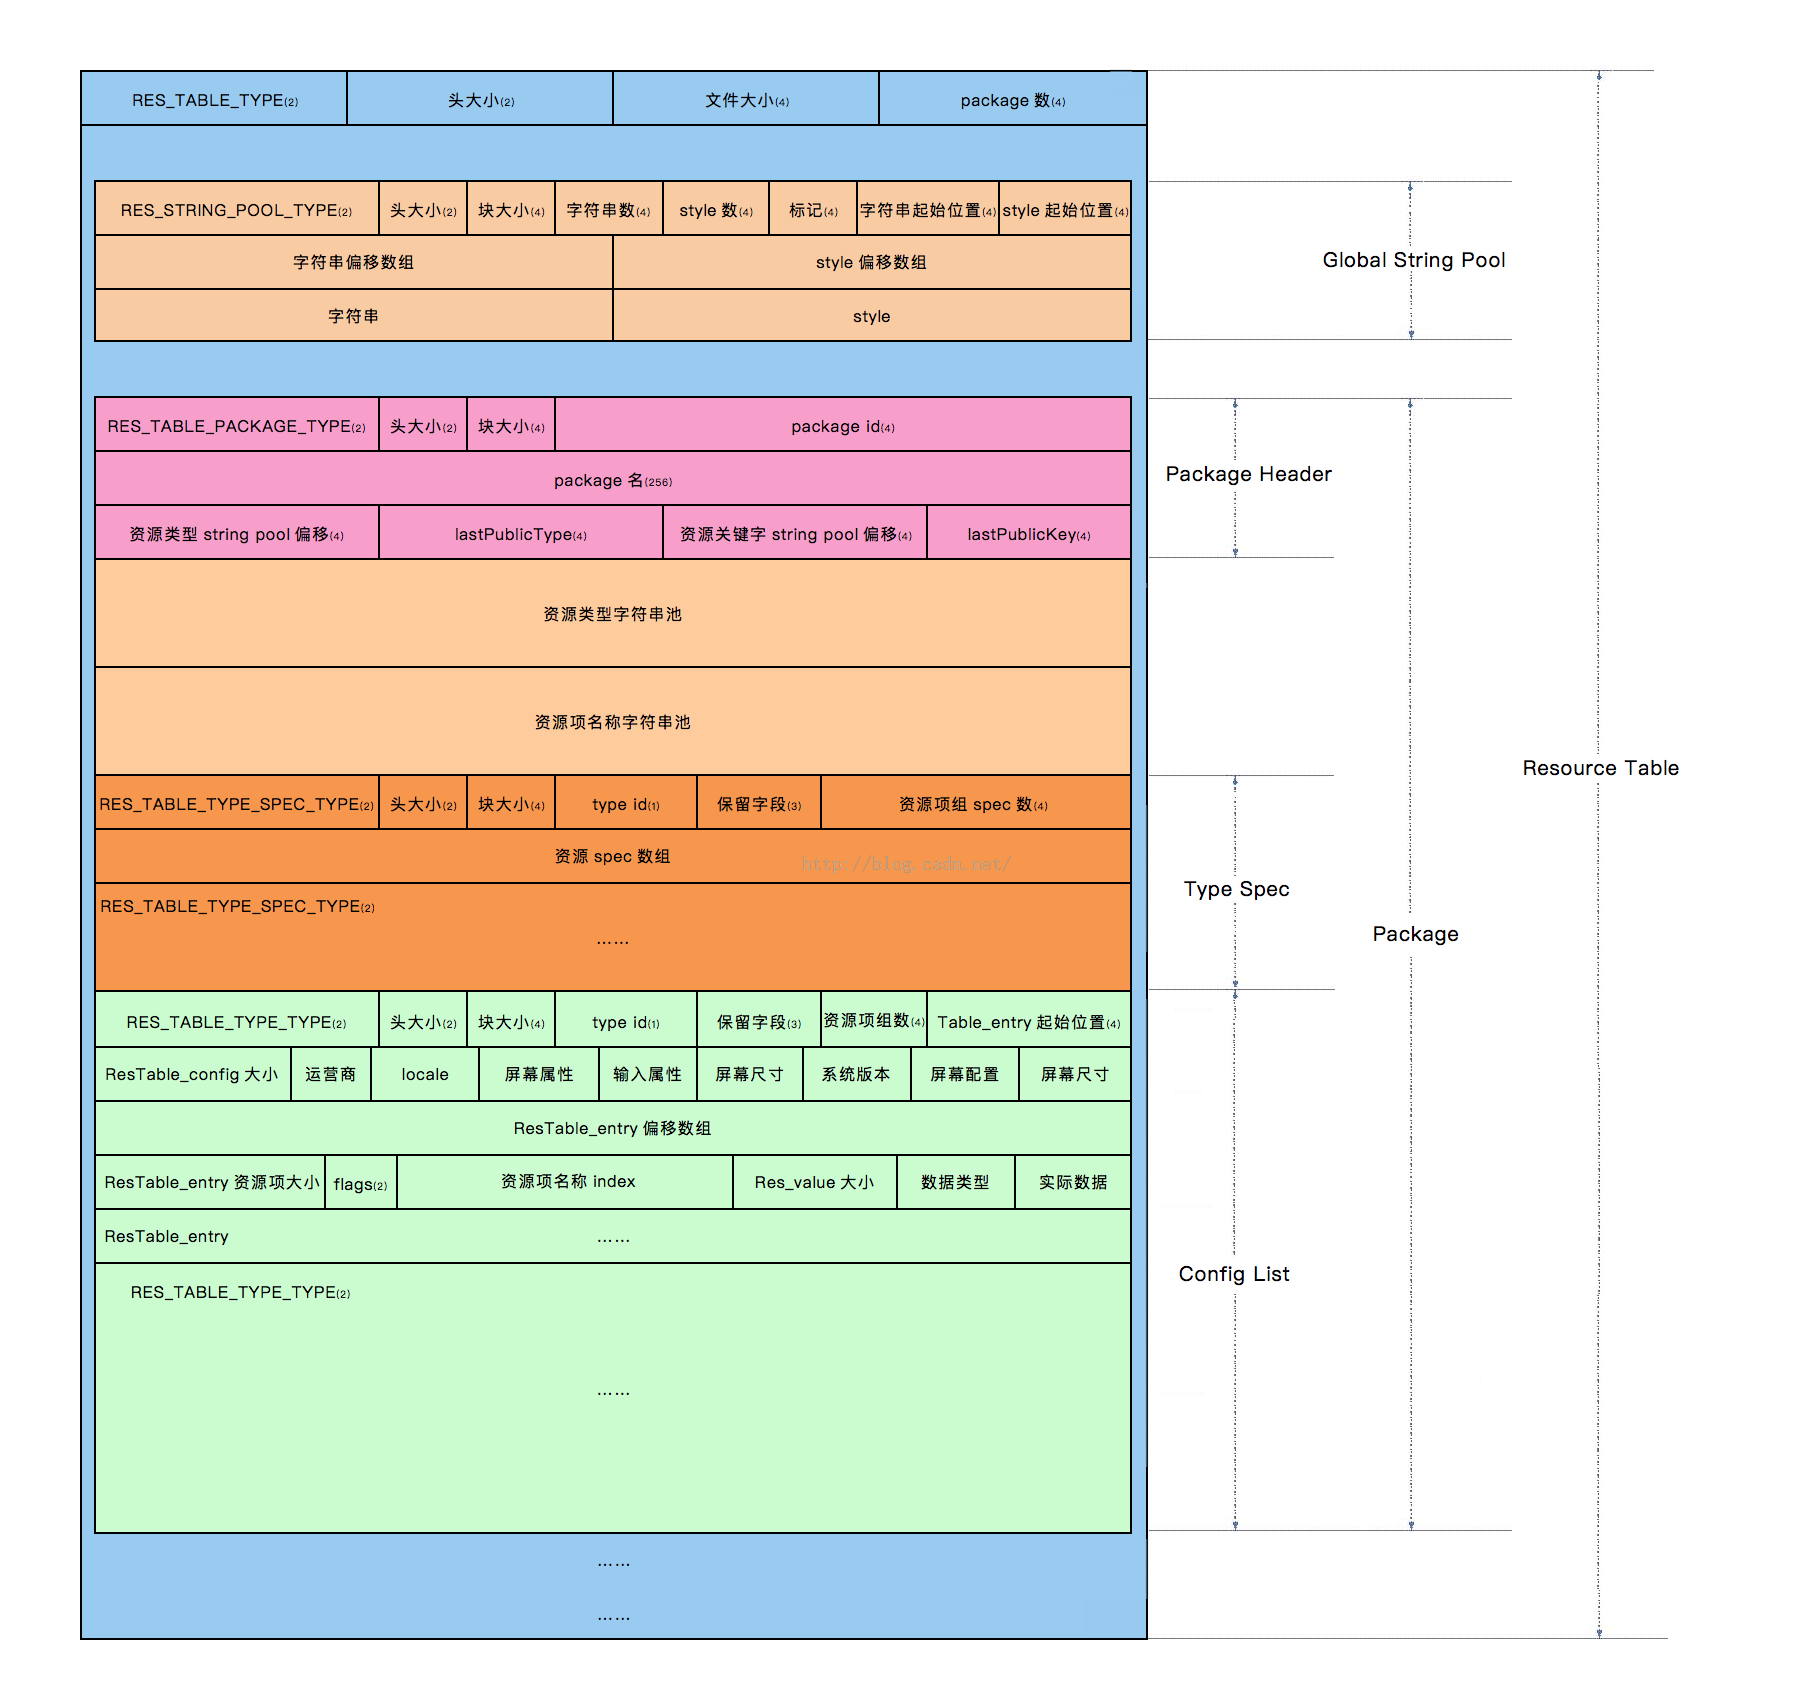
resources.arsc的格式 resources.arsc是一个二进制文件,想要解析他就必须先弄懂这个文件格式到底是什么样子的。
其实整体的就是这个意思了,首先全部的话就是一个resource table,然后依次读取String Pool,Package Header等。
这些格式,具体的都在Android源码里面,具体的文件是ResourceTypes.h,
1
2
3
4
5
6
7
8
9
10
11
12
13
14
15
16
17
18
19
20
21
22
23
24
25
26
27
28
29
30
31
32
33
34
35
36
37
38
39
40
41
42
43
44
45
struct ResChunk_header { uint16_t type; uint16_t headerSize; uint32_t size; }; enum { RES_NULL_TYPE = 0x0000 , RES_STRING_POOL_TYPE = 0x0001 , RES_TABLE_TYPE = 0x0002 , RES_XML_TYPE = 0x0003 , RES_XML_FIRST_CHUNK_TYPE = 0x0100 , RES_XML_START_NAMESPACE_TYPE= 0x0100 , RES_XML_END_NAMESPACE_TYPE = 0x0101 , RES_XML_START_ELEMENT_TYPE = 0x0102 , RES_XML_END_ELEMENT_TYPE = 0x0103 , RES_XML_CDATA_TYPE = 0x0104 , RES_XML_LAST_CHUNK_TYPE = 0x017f , RES_XML_RESOURCE_MAP_TYPE = 0x0180 , RES_TABLE_PACKAGE_TYPE = 0x0200 , RES_TABLE_TYPE_TYPE = 0x0201 , RES_TABLE_TYPE_SPEC_TYPE = 0x0202 }; struct ResStringPool_header { struct ResChunk_header header ; uint32_t stringCount; uint32_t styleCount; enum { SORTED_FLAG = 1 <<0 , UTF8_FLAG = 1 <<8 }; uint32_t flags; uint32_t stringsStart; uint32_t stylesStart; };
因为篇幅原因,所以把注释部分删除掉了,具体的大家可以查阅源码,也有一个不错的源码阅读网站分享给大家,想看的话可以不用下载啦,直接在线看就好了。
源码网站地址,
解析流程 我们首先看Main.java
1
2
3
4
5
6
7
8
9
10
11
12
13
14
15
16
17
18
19
20
21
22
23
24
25
public static void main (String[] args) throws IOException, InterruptedException, BrutException { boolean cmdFound = false ; for (String opt : commandLine.getArgs()) { if (opt.equalsIgnoreCase("d" ) || opt.equalsIgnoreCase("decode" )) { cmdDecode(commandLine); cmdFound = true ; } else if (opt.equalsIgnoreCase("b" ) || opt.equalsIgnoreCase("build" )) { cmdBuild(commandLine); cmdFound = true ; } else if (opt.equalsIgnoreCase("if" ) || opt.equalsIgnoreCase("install-framework" )) { cmdInstallFramework(commandLine); cmdFound = true ; } else if (opt.equalsIgnoreCase("empty-framework-dir" )) { cmdEmptyFrameworkDirectory(commandLine); cmdFound = true ; } else if (opt.equalsIgnoreCase("publicize-resources" )) { cmdPublicizeResources(commandLine); cmdFound = true ; } } }
主要是调用了cmdDecode方法来解码,我们跟进去看看
1
2
3
4
5
6
7
8
9
10
11
12
13
14
15
16
17
18
19
20
21
22
23
24
25
26
27
28
29
30
31
32
33
34
35
private static void cmdDecode (CommandLine cli) throws AndrolibException { ApkDecoder decoder = new ApkDecoder (); int paraCount = cli.getArgList().size(); String apkName = cli.getArgList().get(paraCount - 1 ); File outDir; if ( } else { String outName = apkName; outName = outName.endsWith(".apk" ) ? outName.substring(0 , outName.length() - 4 ).trim() : outName + ".out" ; outName = new File (outName).getName(); outDir = new File (outName); decoder.setOutDir(outDir); } decoder.setApkFile(new File (apkName)); try { decoder.decode(); } catch (OutDirExistsException ex) { } finally { } }
我们跟进decoder.decode()方法来看看
1
2
3
4
5
6
7
8
9
10
11
12
13
14
15
16
17
18
19
20
21
22
23
24
25
26
27
28
29
30
31
32
33
34
35
36
37
38
39
40
41
42
43
44
45
46
47
48
49
50
51
52
53
54
55
56
57
58
59
60
61
62
63
64
65
66
67
public void decode () throws AndrolibException, IOException, DirectoryException { try { File outDir = getOutDir(); AndrolibResources.sKeepBroken = mKeepBrokenResources; if (!mForceDelete && outDir.exists()) { throw new OutDirExistsException (); } if (!mApkFile.isFile() || !mApkFile.canRead()) { throw new InFileNotFoundException (); } try { OS.rmdir(outDir); } catch (BrutException ex) { throw new AndrolibException (ex); } outDir.mkdirs(); LOGGER.info("Using Apktool " + Androlib.getVersion() + " on " + mApkFile.getName()); if (hasResources()) { switch (mDecodeResources) { case DECODE_RESOURCES_NONE: mAndrolib.decodeResourcesRaw(mApkFile, outDir); if (mForceDecodeManifest == FORCE_DECODE_MANIFEST_FULL) { setTargetSdkVersion(); setAnalysisMode(mAnalysisMode, true ); if (hasManifest()) { mAndrolib.decodeManifestWithResources(mApkFile, outDir, getResTable()); } } break ; case DECODE_RESOURCES_FULL: setTargetSdkVersion(); setAnalysisMode(mAnalysisMode, true ); if (hasManifest()) { mAndrolib.decodeManifestWithResources(mApkFile, outDir, getResTable()); } mAndrolib.decodeResourcesFull(mApkFile, outDir, getResTable()); break ; } } else { if (hasManifest()) { if (mDecodeResources == DECODE_RESOURCES_FULL || mForceDecodeManifest == FORCE_DECODE_MANIFEST_FULL) { mAndrolib.decodeManifestFull(mApkFile, outDir, getResTable()); } else { mAndrolib.decodeManifestRaw(mApkFile, outDir); } } } }
一般来说的话,我们会执行到DECODE_RESOURCES_FULL分支里面的,这里面的第一步是setTargetSdkVersion。
我们主要再看看setTargetSdkVersion方法的内部实现
1
2
3
4
5
6
7
8
9
10
public void setTargetSdkVersion () throws AndrolibException, IOException { if (mResTable == null ) { mResTable = mAndrolib.getResTable(mApkFile); } Map<String, String> sdkInfo = mResTable.getSdkInfo(); if (sdkInfo.get("targetSdkVersion" ) != null ) { mApi = Integer.parseInt(sdkInfo.get("targetSdkVersion" )); } }
其实ApkDecoder内部是维护了一个mResTable的,我们的任何的信息都是根据mResTable来取的,那可能会问了,那ApkDecoder内部的ResTable到底是个什么东西呢,其实他就是我们上面的部分说的那张经典的图。
当ApkDecoder发现mResTable变量是空的的时候,会对此进行初始化,接下来我们就主要看看Androlib的getResTable方法,这个方法就是主要从apkFile里面读出mResTable,分析他的格式,
1 2 3 4 5 6 7 8 9 10 11 12 13 14 15 16 public ResTable getResTable (ExtFile apkFile) throws AndrolibException { return mAndRes.getResTable(apkFile, true ); } public ResTable getResTable (ExtFile apkFile, boolean loadMainPkg) throws AndrolibException { ResTable resTable = new ResTable (this ); if (loadMainPkg) { loadMainPkg(resTable, apkFile); } return resTable; }
上面的代码掉有了mAndRes的getResTable方法,然后内部再调用loadMainPkg方法,我们继续跟进内部实现
1
2
3
4
5
6
7
8
9
10
11
12
13
14
15
16
17
18
19
20
21
22
23
24
25
26
27
28
29
30
31
32
33
34
35
public ResPackage loadMainPkg (ResTable resTable, ExtFile apkFile) throws AndrolibException { LOGGER.info("Loading resource table..." ); ResPackage[] pkgs = getResPackagesFromApk(apkFile, resTable, sKeepBroken); ResPackage pkg = null ; switch (pkgs.length) { case 1 : pkg = pkgs[0 ]; break ; case 2 : if (pkgs[0 ].getName().equals("android" )) { LOGGER.warning("Skipping \"android\" package group" ); pkg = pkgs[1 ]; break ; } else if (pkgs[0 ].getName().equals("com.htc" )) { LOGGER.warning("Skipping \"htc\" package group" ); pkg = pkgs[1 ]; break ; } default : pkg = selectPkgWithMostResSpecs(pkgs); break ; } if (pkg == null ) { throw new AndrolibException ("arsc files with zero packages or no arsc file found." ); } resTable.addPackage(pkg, true ); return pkg; }
这个时候首先是执行getResPackagesFromApk方法,获取ResPackage信息,
1
2
3
4
5
6
7
8
9
10
11
12
13
14
15
16
17
private ResPackage[] getResPackagesFromApk(ExtFile apkFile,ResTable resTable, boolean keepBroken) throws AndrolibException { try { Directory dir = apkFile.getDirectory(); BufferedInputStream bfi = new BufferedInputStream (dir.getFileInput("resources.arsc" )); try { return ARSCDecoder.decode(bfi, false , keepBroken, resTable).getPackages(); } finally { try { bfi.close(); } catch (IOException ignored) {} } } catch (DirectoryException ex) { throw new AndrolibException ("Could not load resources.arsc from file: " + apkFile, ex); } }
我们跟进ARSCDecoder的decode方法
1
2
3
4
5
6
7
8
9
10
11
12
13
14
15
16
17
public static ARSCData decode (InputStream arscStream, boolean findFlagsOffsets, boolean keepBroken, ResTable resTable) throws AndrolibException { try { ARSCDecoder decoder = new ARSCDecoder (arscStream, resTable, findFlagsOffsets, keepBroken); ResPackage[] pkgs = decoder.readTableHeader(); return new ARSCData (pkgs, decoder.mFlagsOffsets == null ? null : decoder.mFlagsOffsets.toArray(new FlagsOffset [0 ]), resTable); } catch (IOException ex) { throw new AndrolibException ("Could not decode arsc file" , ex); } }
1
2
3
4
5
6
7
8
9
10
11
12
13
14
15
16
private ResPackage[] readTableHeader() throws IOException, AndrolibException { nextChunkCheckType(Header.TYPE_TABLE); int packageCount = mIn.readInt(); mTableStrings = StringBlock.read(mIn); ResPackage[] packages = new ResPackage [packageCount]; nextChunk(); for (int i = 0 ; i < packageCount; i++) { mTypeIdOffset = 0 ; packages[i] = readTablePackage(); } return packages; }
那么这里的时候,关键的点总算来了,首先是读取了ChunkCheckType,Header.TYPE_TABLE的值是0x0002, 这里的type正好对应上了我们在ResourceTypes.h里面对应的RES_TABLE_TYPE = 0x0002,其实就是图中最外层的那个ResourceTable
我们跟进nextChunkCheckType方法,
1 2 3 4 5 6 7 8 9 10 11 12 13 14 15 16 17 18 19 20 21 22 23 24 25 26 27 28 29 30 31 32 33 34 35 36 37 38 39 private void nextChunkCheckType (int expectedType) throws IOException, AndrolibException { nextChunk(); checkChunkType(expectedType); } private Header nextChunk () throws IOException { return mHeader = Header.read(mIn, mCountIn); } public static Header read (ExtDataInput in, CountingInputStream countIn) throws IOException { short type; int start = countIn.getCount(); try { type = in.readShort(); } catch (EOFException ex) { return new Header (TYPE_NONE, 0 , 0 , countIn.getCount()); } return new Header (type, in.readShort(), in.readInt(), start); } private void checkChunkType (int expectedType) throws AndrolibException { if (mHeader.type != expectedType) { throw new AndrolibException (String.format("Invalid chunk type: expected=0x%08x, got=0x%08x" , expectedType, mHeader.type)); } }
读取一个Chunk,如上方所示调用关系,关键的地方已经加上了注释。
nextChunkCheckType(Header.TYPE_TABLE)主要是读取了下面红圈的部分。
我们继续分析readTableHeader方法。
1
2
3
4
5
6
7
8
9
10
11
12
13
14
15
16
17
private ResPackage[] readTableHeader() throws IOException, AndrolibException { nextChunkCheckType(Header.TYPE_TABLE); int packageCount = mIn.readInt(); mTableStrings = StringBlock.read(mIn); ResPackage[] packages = new ResPackage [packageCount]; nextChunk(); for (int i = 0 ; i < packageCount; i++) { mTypeIdOffset = 0 ; packages[i] = readTablePackage(); } return packages; }
接下来主要分析StringBlock的read方法
1
2
3
4
5
6
7
8
9
10
11
12
13
14
15
16
17
18
19
20
21
22
23
24
25
26
27
28
29
30
31
32
33
34
35
36
37
38
39
40
41
42
43
44
45
46
47
48
49
50
51
52
53
public static StringBlock read (ExtDataInput reader) throws IOException { reader.skipCheckInt(CHUNK_STRINGPOOL_TYPE); int chunkSize = reader.readInt(); int stringCount = reader.readInt(); int styleCount = reader.readInt(); int flags = reader.readInt(); int stringsOffset = reader.readInt(); int stylesOffset = reader.readInt(); StringBlock block = new StringBlock (); block.m_isUTF8 = (flags & UTF8_FLAG) != 0 ; block.m_stringOffsets = reader.readIntArray(stringCount); block.m_stringOwns = new int [stringCount]; Arrays.fill(block.m_stringOwns, -1 ); if (styleCount != 0 ) { block.m_styleOffsets = reader.readIntArray(styleCount); } int size = ((stylesOffset == 0 ) ? chunkSize : stylesOffset) - stringsOffset; block.m_strings = new byte [size]; reader.readFully(block.m_strings); if (stylesOffset != 0 ) { size = (chunkSize - stylesOffset); block.m_styles = reader.readIntArray(size / 4 ); int remaining = size % 4 ; if (remaining >= 1 ) { while (remaining-- > 0 ) { reader.readByte(); } } } return block; }
reader.skipCheckInt(CHUNK_STRINGPOOL_TYPE)跳过的部分如下:
1
2
3
4
5
6
7
8
9
10
11
12
13
14
15
16
17
18
19
private ResPackage[] readTableHeader() throws IOException, AndrolibException { nextChunkCheckType(Header.TYPE_TABLE); int packageCount = mIn.readInt(); mTableStrings = StringBlock.read(mIn); ResPackage[] packages = new ResPackage [packageCount]; nextChunk(); for (int i = 0 ; i < packageCount; i++) { mTypeIdOffset = 0 ; packages[i] = readTablePackage(); } return packages; }
重复性任务 emmmmm。。。。博主详细如果你读懂了前面的分析,那么这个肯定也不在话下 。
所以呢,我就不一一的带大家理解,主要的还是看懂那张图,然后看懂ApkTool是如何来分析就可以啦。
这样做的好处就是,如果有apk在这个resource.arsc文件内做文章,我们可以debug反查,看看到底是怎么回事,可以有一些自己对付的思路。
readTablePackage之后 读取完了之后,程序就会一步一步的返回回去,这个时候我们的mResTable变量就初始化好了,就可以继续进行setTargetSdkVersion方法的执行了,
我们这篇博客主要就是进行ApkDeocder成员变量mResTable的初始化分析,
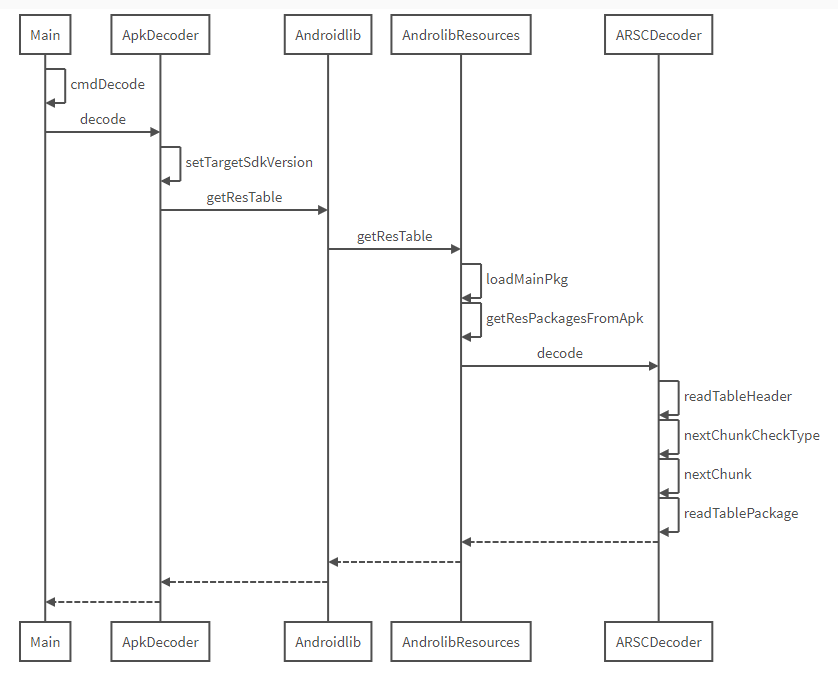
1
2
3
4
5
6
7
8
9
10
11
12
13
14
15
16
17
18
19
20
21
22
23
24
participant Main participant ApkDecoder participant Androidlib participant AndrolibResources participant ARSCDecoder Main->Main: cmdDecode Main->ApkDecoder: decode ApkDecoder->ApkDecoder: setTargetSdkVersion ApkDecoder->Androidlib: getResTable Androidlib->AndrolibResources: getResTable AndrolibResources->AndrolibResources:loadMainPkg AndrolibResources->AndrolibResources:getResPackagesFromApk AndrolibResources->ARSCDecoder: decode ARSCDecoder->ARSCDecoder: readTableHeader ARSCDecoder->ARSCDecoder: nextChunkCheckType ARSCDecoder->ARSCDecoder: nextChunk ARSCDecoder->ARSCDecoder: readTablePackage ARSCDecoder-->AndrolibResources: AndrolibResources-->Androidlib: Androidlib-->ApkDecoder: ApkDecoder-->Main:
防止在某些平台上,不支持Markdown的UML图,下面特意放一张图片
写在最后 分析源码并不难,希望大家都能耐下心来一点一点看,一点一点调试分析。
正因为调用比较深,所以最后画出了UML图,希望能让大家看得更简单明了
关于我 个人博客:MartinHan的小站
博客网站:hanhan12312的专栏
知乎:MartinHan01